13 August 2011

Ansel Adams: Saint Francis Church, Ranchos de Taos

Saint Francis Church, Ranchos de Taos, New Mexico, c. 1929-© The Ansel Adams Publishing Rights Trust This image is copyrighted by The Ansel Adams Publishing Rights Trust and cannot be printed or reproduced in any way. The use of the photograph is limited to viewing in the context of this web site.
Susan Brannon
13 August 2011
Saint Francis Church, Ranchos de Taos, New Mexico, c. 1929 - When he first saw the church, Adams was impressed by it's "magnificent form" and its "rigorous and simple design and structure." The photograph of this church was shot from the rear, which was the angle that Adams thought made it "one of the great architectural monuments of America." He wrote in Elements, "it is not really large, but it appears immense. The forms are fully functional; the massive rear buttress and the secondary buttress to the left are organically related to the basic masses of adobe, and all together seem an outcropping of the earth rather than merely an object constructed upon it."

Though this church is not actually in the Pueblo, it held significance for the entire area. Constructed in 1776, it is in the little Mexican American settlement of Ranchos de Taos a few miles south of the Pueblo. It had been interpreted by many painters and photographers, and Adams said he could not resist the challenge.

Adams wrote in Elements, "We should never deny the power of intuition or hesitate to follow its revelations... It is essential that the artist trust the mechanisms of both intellect and creative vision. The conscious introspective critical attitude has no place in the luminous moments of creative expression, but should be reserved for later, when the work is complete." He stated, "I seemed to know precisely the square yard of earth on which to place my tripod." He said, "Some intuitive thrust made this picture possible."

Adams stated in Elements that "this image is an experience in light." He described how he had used yellow and red filters before in many images in special high-altitude light of the Southwest. "But on this occasion some gentle angel whispered 'no filter' and I obeyed." Taking the shot with no filter allowed the blue sky to appear quite light, and the shadows were softened... A darker sky would have depreciated the feeling of light." He asks a good question himself: "What mechanism of the eye and mind selects patterns and relationships in an unfamiliar world about us and composes them as expressive images?" He doesn't claim to have the answers.

    * Camera: 6 1/2 X 8 1/2 Korona View
    * Lens: 8 1/2 inch Tessar-type lens
    * Film: orhochromatic (sensitive only to blue and green light)
    * Filter: none
    * Paper: Dassonville Charcoal Black on mildly textured rag paper of highest quality Developer Amidol

Information taken from: HHMA

12 August 2011

Ansel Adams: Moonrise Hernandez

Ansel Adams - Moonrise Hernandez
Susan Brannon
 12 August 2011
Moonrise Hernandez - 4:05 P.M. on October 31, 1941 Moonrise is one of Adam's most popular images. Why is that?  Do you notice the white clouds, the moon, or the white gravestones first? Do you notice how the photograph is divided according to the "Rule of Thirds?"
Many artists believe it is boring to look at images that are absolutely symmetrical, with images divided exactly in half. In Moonrise, Adams has stimulated our eye by offering three layers, each with a different tone: the black sky, the white clouds, and the gray landscape. Adams made an interesting composition, which became very popular. It "combined serendipity and immediate technical recall." Serendipity means lucky chance. He "felt at the time it was an exceptional image" and when he took it, he felt "an almost prophetic sense of satisfaction." The scene has changed, there are still some of the same features, but the road is wider and busier.  There are more modern buildings, but the graveyard is still there.  When he was a young creative photographer, his original prints sold for $10, and in the 1960s for $50 - $100. The price for a print of Moonrise in the early 1970s was $500. Then the value of the creative photographs of Ansel Adams skyrocketed. At an auction in 1981, the sale of Moonrise set a record price for a photograph - $71,500! Ansel Adams was returning to Santa Fe, New Mexico after a discouraging day of photography. From the highway he glanced left and "saw an extraordinary situation - an inevitable photograph! I almost ditched the car and rushed to set up my 8 X 10" camera. I was yelling to my companions to bring me things from the car…I had a clear visualization of the image I wanted but…I could not find my exposure meter! The situation was desperate: the low sun was trailing the edge of clouds in the west, and shadow would soon dim the white crosses." He felt at a loss to guess the correct exposure, but suddenly realized he knew the luminance of the moon and quickly took the shot."

"
I was at a loss with the subject luminance values, and I confess I was thinking about bracketing several exposures, when I suddenly realized that I knew the luminance of the moon – 250 c/ft2. Using the Exposure Formula, I placed this luminance on Zone VII; 60 c/ft2 therefore fell on Zone V, and the exposure with the filter factor o 3x was about 1 second at f/32 with ASA 64 film. I had no idea what the value of the foreground was, but I hoped it barely fell within the exposure scale. Not wanting to take chances, I indicated a water-bath development for the negative.
Realizing as I released the shutter that I had an unusual photograph which deserved a duplicate negative, I swiftly reversed the film holder, but as I pulled the darkslide the sunlight passed from the white crosses; I was a few seconds too late!”
Paraphrase of John Sexton, Ansel's technical assistant from 1979 to 1982
In October 1941 Ansel Adams was 39 years old, probably in peak physical shape and certainly at or near the height of his field photography. He was well practiced in every motion, and the time that it takes to make a duplicate negative, to replace the slide, reverse the film holder, remove the slide and cock the shutter is less than 3 seconds. Given that the initial exposure was 1 second and the decision to make a duplicate negative occurred then, Ansel was very, very close to missing that image. It is a testament to his skills that we are able to appreciate it today.”

  • Camera: 8 X 10 view camera
  • Lens: Cooke triple convertible lens.
  • Light meter: lost!
  • Film: Speed: ASA 64
  • Filter: Wratten No. 15 (G) filter
  • Exposure: 1 second at f/32.
  • Development: dilute D-23 and ten developer to water sequences.
    Years later - refixed, washed the negative, and treated the lower section with a dilute solution of Kodak IN-5 intensifier.

11 August 2011

Ansel Adams: Aspens

Ansel Adams -Aspens  ©2008 Ansel Adams Publishing Rights Trust
Ansel Adams - Aspens (no title)
Ansel Adams -  Aspens Northern New Mexico © The Ansel Adams Publishing Rights Trust
These images are copyrighted by The Ansel Adams Publishing Rights Trust and cannot be printed or reproduced in any way. The use of the photograph is limited to viewing in the context of this web site.
11 August 2011
Aspens- I believe that the second image was taken in Northern New Mexico in 1958.  Adams took many aspen images while he was there, and with this photo, the lighting looks like it was taken at the same time as the known and famous image that Adams is titled, "Aspens of Northern New Mexico"  I could not find the copyright on this one, nor a title, but I really like it. I chose this image because of the geometric of the trees and the lighting reflecting the fullness of the trees.  The first image shows a mastery of a vast spectrum of shadow and luminous light within the simplicity of black and white. The single lit leading tree with many other trees standing behind it.  
In this set of images, you can see how Adam's walked around to capture different views of the same subject.  He used the natural lighting, and it could have been taken either at sunrise, or near sunset because of the light on the trees.


10 August 2011

Ansel Adams: Roots, Foster Gardens, Honolulu

Ansel Adams - Roots, Foster Gardens, Honolulu © 2004 by the Trustees of the Ansel Adams Publishing Rights Trust. Courtesy of George Eastman House.
Susan Brannon
10 August 2011
Roots, Foster Gardens, Honolulu- 1948.  This is one of Adams images that is refined with close up detail rather than the vast images of landscape. He worked with texture and abstract imagery in this image. The roots, draw your eyes to find the trunk of the tree.
Adams once said, "To photograph truthfully and effectively is to see beneath the surfaces and record the qualities of nature and humanity, which live or are latent in all things."

09 August 2011

Ansel Adams:Dunes, Oceano, California

Susan Brannon
09 August 2011
Ansel Adams -Dunes, Oceano, California
Susan Brannon
Dunes, Oceano, California, 1963. The shadows in the sand dunes reflect the incredible patterns of the hills made from the timeless winds in the dunes.  At first I thought this image was of the white sands in New Mexico, however, sand dunes are sand dunes and this image makes me want to jump in and leave my footprint!

08 August 2011

Ansel Adams: Moon and half Dome

Ansel Adams-Moon and Half Dome
Susan Brannon
8th August 2011
Moon and Half Dome - This image was taken at Yosemite National Park in 1963. Adams reahed for his Hasselbland and took his camera and tripod into the meadow looking for the spot where the elements come together; the full moon, the valley and the silhouette of Washington Column.

This image became a classic and one of the most love black and white pictures made. To make the same scene, you need to have the light, the moon and the shadow all in place.  Adams made this shot in December around Christmas time, if you want to go and try it yourself!

07 August 2011

Ansel Adams: Jeffrey Pine, Sentinel Dome

Ansel Adams - Jeffrey Pine, Sentinel Dome
Susan Brannon
7 August 2011
Jeffrey Pine, Sentinel Dome - 1940.  Adams too this image with his 4" x 5" view camera. Today, the hike up the Mist Trail to Vernal Fall is short, accessible, and heavily trafficked. John Muir, in his book " …it is a favorite with most visitors, doubtless because it is more accessible than any other, more closely approached and better seen and heard. A good stairway ascends the cliff beside it and the level plateau at the head enables one to saunter safely along the edge of the river as it comes from Emerald Pool and to watch its waters, calmly bending over the brow of the precipice, in a sheet eighty feet wide, changing in color from green to purplish gray and white until dashed on a boulder talus." The Mist Trail is notoriously wet -- standing in the rain can be drier. Adams would have faced challenges keeping his equipment dry while capturing this familiar icon of Yosemite .
 

 If you want to take the picture and did not get there before 2003, when the tree finally fell over (it died during a drought in 1977), you're out of luck. However, people still flock to Sentinel Dome to take a photograph of this tree, I bet that It has since become one of the most photographed trees in the country.

06 August 2011

Ansel Adams: Moonrise

This image is copyrighted and is for the sole use of viewing on this website

Susan Brannon
6 August 2011
Moonrise, Hernadez, New Mexico - Was one of his most famous.  The ititial publication of Moonrise was in U.S. Camera 1943 annual.  For nearly 40 years, Adams re-interpreted the image using the latest darkroom equipment at his disposal, making over 1,300 unique prints, mostly in 16" x 20" format.  Many of the prints were made in the 1970's giving him more freedom from the commercial projects that seemed to blog him down.  He took this shot after the sun had gone down and the light on the crosses were rapidly fading and he could not find his exposure meter. He remembered the luminance of the moon, and used it to calculate the proper exposure.  The exposure was underexposed, and the highlights in the clouds were quite dense.  He found the negative difficult to print.  The total value of this print exceeds 25,000.00 with the highest price for a singe print reached $609,600 at an auction in NY in 2006.  He made this image on November 1, 1941.

Some of Adams images are owned by the U.S. Government because he worked for  the Department of the Interior.  However, it was his day off when he took Moonrise, so he had full ownership of the negative.

05 August 2011

Photo Bucket List

You won't believe this, but this is on the Arno in Florence!

Susan Brannon
5th August 2011

I heard about this on Alex Beadan's Photography Blog; that linked to PhotoFocus Blog   I liked it so much that I decided to re-blog to share the Photography Bucket List for photographers!

"How about you? Do you have a photography bucket list? Starting one should be easy. It doesn’t have to be a formal list or look a certain way. You can make it anyway you like.

Some thought starters might help propel you to creating your list.

1. First decide what your photographic goals are
2. Think of the list not so much from the “before I die” point-of-view, but rather the “here are some goals” point-of-view
3. Don’t limit yourself to what you think is possible
4. Be honest – you don’t have to show the list to anyone else so don’t put things on there just to impress someone or leave something off just because you’d be embarrassed if someone saw it
5. Consider your first list to be nothing more than a first draft – let is stew for a bit then come back to it and refine"

Thanks to Scott Bourne for the idea!
I am going to make my own Photo Bucket List and post it later.
Related Articles:
Aperture and f/16 Rule
Shutter Speed Basics

Bracketing
Depth of Field
Focused Bracketing or Photo Stacking

Ansel Adams: Autumn Moon

Ansel Adams - Autumn Moon
Susan Brannon
9 August 2011
Autumn Moon - 1948, the images was taken from Glacier Point at Yosemite National park on September 15 at around 7:03 pm. Adams is famous for recording details in this image.  It is said that the full moon arching high in the northern hemisphere only occurs on every lunar Metonic cycle. The dates to be able to get this exact moon will be in 19 year cycles, 1967, 1986,2005,2024.  Sorry folks, you will have to wait until 2024 to recreate this exact image.

04 August 2011

Ansel Adams

Susan Brannon
4th August 2011
Ansel Adams a Biography 

Ansel Adams has been the environmental legendary photographer who captured Americas beauty through the lens.  He is known for his black and white photographs that resound with shadows and light.  In my opinion, he has been one of the best photographers in our American history.

He was born in San Francisco on February 20, 1902 and passed on in April 22, 1984. He was a traveler and environmentalist who had a keen passion for nature. It is assumed that Ansel Adams suffered from dylexia, because he had problems fitting in at school.  Some others feel that he may have had ADHA, hyperactive disorder.  His father decided to tutor him at home, and earned a diploma completing the 8th grade from Mrs. Kate M. Wilkins Private School.

He would wolk in nature in his childhood in the wilds near the Golden gate bridge or hiking the dunes along Lobos Creek and off to Bakers Beach.  Later in life, he set out through America.

At twelve years old, Ansel Adams taught himself to play the piano and became his primary occupation.  It could be that the training and discipline required to learn the piano influenced his view of photography.

His first camera was the Kodak No. 1 Box Brownie that his parents bought him.  He would take the camera with him during his hikes and spent the first four summers from 1919, in Yosemite Valley as the "keeper" of the Sierra Clubs, LeConte Memorial Lodge.


The Sierra Club contributed to Ansel Adams success as a photographer because he first published photographs and writings in the club's 1922 Bulletin, and in 1928 he had his first one man exhibition in San Francisco.

in the late 1920's, the Sierra Club would offer month long trips in the Sierra Nevada, where the participants hiked each day to a new campsite, using mules, packers, and cooks.  Adams, was the photographer of the outings and he soon realized that he could earn enough money to survive.  By 1934, Adams was elected to the club's board of directors and was already established as both artist and director of the Sierra Nevada.

Ansel Adams met photographer, Paul Strand in the 1930's and influenced his work from "pictorial style" to "straight photography", using the clarity of the lens.  Adams developed the development techniques of "burning" and "dodging" as well as the "zone system" to adjust the tonality of the images.  In 1952 Adams was one of the founders of the magazine Aperture, which was intended as a serious journal of photography showcasing its best practitioners and newest innovations.

Although Adams was gaining in popularity, in the 1930's he still seemed to have difficulty with financial pressures. He was busy, as a commercial photographer, but the clients took control.  He worked for National Park Service, Kodak, Zeiss, IBM, AT&T, Life, Fortune and the Arizona Highways magazines, shooting portraits to catalogues.  He was loosing his track in photography because he was swamped with commercial work for practical reasons.

Adams was good with technical matters in photography as consulted companies like Weston and Strand, Polaroid, and Hasselbland.  Ansel Adams was a activist of the cause of the wilderness and environment.  Adams images became an icon of wild America.  His images are no "realistic" of nature, but they have an intensification and purification of the experience of natural beauty.  (Ansel Adams)
His compelling images came from inspiration!

Related Articles:
Henri Cartie'r-Bresson (article)
Henri Cartie'r Bresson (Images)

02 August 2011

Tips for Beautiful Landscapes

Susan Brannon
2 August 2011

There are many types of landscapes.  Rivers, mountains, forests, desert, swamps and each place has their own personality.  Find that personality, why is the Negev desert different than the Sahara desert?  You want to reflect that in your image.  Don’t just take an image of a bunch of sand blowing in the wind.  Your image needs to show the places distinct beauty. 

What is it that attracted you to that place?  Do you love big trees or splashing waves?  Find your passion in the place, the more you find that passion the better you will be at taking the images.  Our admiration for the subject always seems to come out in our images.

As far as what lens to bring, really depends on where you are going.  For example, if you are going to embark on a safari, you will want a zoom lens from 100-400mm.  Your subjects will be far away and it will be difficult to get close to your subjects from your jeep.  If you are hiking, you will want to bring a wide angle lens and smaller zoom.  Using a f/4.5-5.6 is fine for landscape.

Here are some tips to help get the picture right!

•    If possible use a tripod, the stability of a tripod will sharpen your landscape image avoiding any shake.
•    Look at what you are looking at, why do you like it?  What do you want to reflect in your image?  Is it the tree silhouetted in the sunset?  Is it the robustness of the stones in a tall mountain?  Find what that is, then focus on that.  Find a good angle for your tree or the stones that show its beauty.  Make what attracts you, your focal point.  Think about where you place it in your image.
•    Consider the sky – The sky is a part of the landscape.  You may want the sky dominant or your foreground dominant in your image. If the sky is bland, then place your horizon in the upper third of your frame.  If the sky is full of colors and beautiful clouds, then you will want to make your horizon lower.
•    Look at your depth of field and maximize it.  Remember to increase your depth of field is to make your aperture setting small (the larger number)  Remember that smaller apertures allow less light into your lens and you may have to adjust your shutter speed or ISO.
•    Look at your lines, where does the eye lead in the frame?  Look through your viewfinder to find lines that lead to your subject.  They also give a depth to your image.
•    Landscapes are not always still and calm, they have movements.  Capture them!  You will need a longer shutter speed (this is why a tripod is good) and lower your aperture.  You can also use a filter to diffuse some of the light.  Examples of movement are clouds, waterfalls, sea or birds.
•    Remember the “Golden Hours” Before sunrise and sunset.  Read up and be prepared for when those hours are before you go.  You will find that it is worth it.
•    Think about the rule of thirds while taking your shot.
Related lessons:
Aperture and f/16 Rule
Shutter Speed Basics

Bracketing
Depth of Field
Focused Bracketing or Photo Stacking

01 August 2011

How to avoid Camera Shake


Susan Brannon
1 August 2011
Avoiding Camera Shake

Why do my images turn out blurry?  It is called camera shake, we all have shaky hands. To get a good sharp image:

For this image, I had to have my aperture wide open because of the night shot.  I did not have a tripod to stop the camera shake.

Although I did not have a tripod and my aperture was wide open, I used what I could to try to eliminate the blur.  I held my breath.  However, this image is not as sharp as it could be if I had a tripod.
Here are some hints to avoid camera shake:
hold the camera very steady
use a tripod
gently press the shutter button
hold your breath while snapping the shot
lean against a nearby wall

Camera shake increases as the telephoto zoom setting increased because the leans automatically magnify the vibrations.  A long telephoto and zoom lens are simply larger and longer making it more difficult to hold steady.

The normal limit of your shutter speed to reduce the "shake" is 1/60th/second or longer.
Breathe, stay calm, breath before you take your shot!
Related lessons:
Aperture and f/16 Rule
Shutter Speed Basics

Bracketing
Depth of Field
Focused Bracketing or Photo Stacking

30 July 2011

Tips for Outdoor Photography

Susan Brannon
6 August 201
Outdoor photography is similar to landscape photography.  But more than landscape, you take images of mother- nature, animals, trees, or water!

Here are some quick tips to help you get out of the box:
•    Blur your background.  Make your focal point that beautiful flower or bee using your macro lens, and open your aperture! 
•    Create Abstracts:  Look at the stones capture the interweaving of the mountain
•    Use the color around you, if you see bright purple flowers in the middle of a field; create a line with the flowers leading to the hills behind them.  Take images of just the color of the object.
•    Use a Polarizer Filter- This is a must, to reduce reflections and haze.
•    Use a tripod- to get the sharpest image possible
•    Pay attention to your background- don’t let that tree stick out of the middle of your image from a persons head.
•    Get low- gives a great perspective
•    Use the “golden hours”- It is called that for a reason!  These are the perfect times to take outdoor images.  The colors can be so brilliant!
•    Have Patience, for those bird and animal images!  A virtue.
•    Look at the verticals and horizontals- the tree trunks all in a row with the glitter of light shining down on them.  Take a shot of just the trunks!
•    Symmetry and Balance- Balance your image
•    Keep it simple- don’t put too many confusing things in your image
•    Put people in the landscape.  It can provide both a focal point and a perspective.
•    Dial down your exposure by a half-step.  This can give colors a boost! Your blacks will really be black.  Everything seems to come more alive.
•    Look down at your feet and see the details, like the cracked soil, or the small flowers growing from a stone.  Slow down while you are walking around.  Sit down and look around.
•    Try to take images without depending on PhotoShop.  Really.
Related lessons:
Aperture and f/16 Rule
Shutter Speed Basics

Bracketing
Depth of Field
Focused Bracketing or Photo Stacking

28 July 2011

Quick Lesson on Camera Filters

Susan Brannon
28 July 2011
A Lesson on Filters

You can get some really nice and creative effects using filters during the actual shooting, rather than using your processing software. The filters are used normally for color correction, to compensate the effects of lighting that is not balanced.  For example, a blue filter used in daylight, corrects the orange/reddish cast lighting.  Filters are identified by numbers with vary from manufacture to manufacturer.

Here is a list of typical filters and what they do:

UV Filters:  They are used to reduce the haziness created by ultraviolet light.  They are normally transparent and can be left on the camera for nearly all shots.  They are often considered good for lens protection as well.  A strong UV filter cuts off the violet part of the spectrum and has a pale yellow in color, which are more effective in cutting the haze.

Clear filters:  They are completely transparent in perform no filtering of incoming light.  This is used solely to protect the front of the lens.

Polarizer:  This filter is great for both black and white photography and color.  The filter polarizes the light and reduces reflections, darken the sky and saturates the image more by eliminating unwanted reflection.

Colored filters: They come in almost every color, the yellows are good for portrait image taking while the reds are good for architecture.  Instead of purchasing a filter of every color, I use the plastic filter squares that you use when developing your own film!  I set the filter in front of my lens while taking the shot.  The package for the filters are less expensive than buying each colored filter for your camera and actually quicker to use if you are wanting to play around and take many images using different colors.

Diffusion Filters:  These are also called softening filters that give a misty quality to impart a romantic mood.  They are good for portraits because they soften the wrinkles and blemishes.  They have different levels of intensity, but the milder ones are the best.  They work well with wide apertures because they increase the depth of field and softening effect.

Transparent diffusion:  They are made of tiny globs of acrylic deposited on the surface to diffuse light.  Some globs are inside of the filter and some on the outside.  The filters are used for the dreamy or misty effect.  You can also do this by adding petroleum jelly, optic cement and nail polish to a clear or UV filter.

Neutral density:  has uniform density that attenuates light of all colors equally.  It it normally used for longer exposer that creates a blur or larger aperture, for selective focus.

Split-field density filters:  They have a graduated area of color across the surface.  They typically come in one, two and three stop densities.  they add a tinge of color to the sky, that you can see in magazine ads. 

Star filters: have patterns from point of light sources, such as candles, and sparkles on water.  They come in four, six and eight point configurations.

Grid Filters:  Normally used to provide diffusion effects, for dreamy looks and contrast reduction. The grids on the filter are typically in squares or diamonds made from nylon.  You can also create the same effect by stretching a piece of pantyhose in front of the lens.

Related lessons:
Aperture and f/16 Rule
Shutter Speed Basics

Bracketing
Depth of Field
Focused Bracketing or Photo Stacking

26 July 2011

Perspectives in Photography

Susan Brannon
26 July 2011
 Photography Tips for Composition


Photography is not only cropping, cleaning and auto balancing your image to make that great shot.  However, I understand that in commercial, portrait, and creative photography, cropping, resetting, and altering the images is the norm.  Who wants to look at an advertisement for beauty cream with the face all blotchy and full of pimples? Have you ever seen a real live person that looks a perfect as they do in the magazine?


The secret for taking beautiful images lies in your aspiration, passion and admiration of the subject, if it be landscape, people, buildings or food.  For some reason, when you are attracted to the subject it shows in your images and they reflect your passion. Using techniques such as composition, angles, light can help you to create a wonderful image, that can only be tools to help enhance your images.  Using light can draw your focus onto your subject, the angle use can change the representation of your subject from short to tall for example. 

Perspective is important while deciding on what angle to use, what light is best to set up your shot.  Rule of thumb, take your time and never be in a hurry before taking a shot.  Imagine in your mind that instead of using your digital camera that allows you to trash the images you do not like, you are using film.  That precious film that costs so much to develop each roll and each shot depends on your angles, perspective, and lighting.  This way, you can learn to be careful and think before snapping and shooting your image.

Here are a few important tips for enhancing your images:

Perspective:
Don’t just walk up to something that you want to take a picture of and snap a shot!  Don’t only look at the subject from eye level!  Walk around your subject, if you can, or take a one -meter step to your left, to your right, up and down while looking through your viewer.  Do you see anything that stands out to you?  Which position reflects what you want to show in your image?  Take a series of shots from different angles.  I saw a new stature in front of the Pitti Palace in Florence, Italy and walked around it. Like This!

Perspective 1
Perspective 2
Perspective 3
Perspective 4
Perspective 5
You can see the difference with the various perspectives, just by walking around the statue and taking my time and looking at what I am seeing!
Which one do you like best?


Related lessons:
Aperture and f/16 Rule
Shutter Speed Basics

Bracketing
Depth of Field
Focused Bracketing or Photo Stacking

25 July 2011

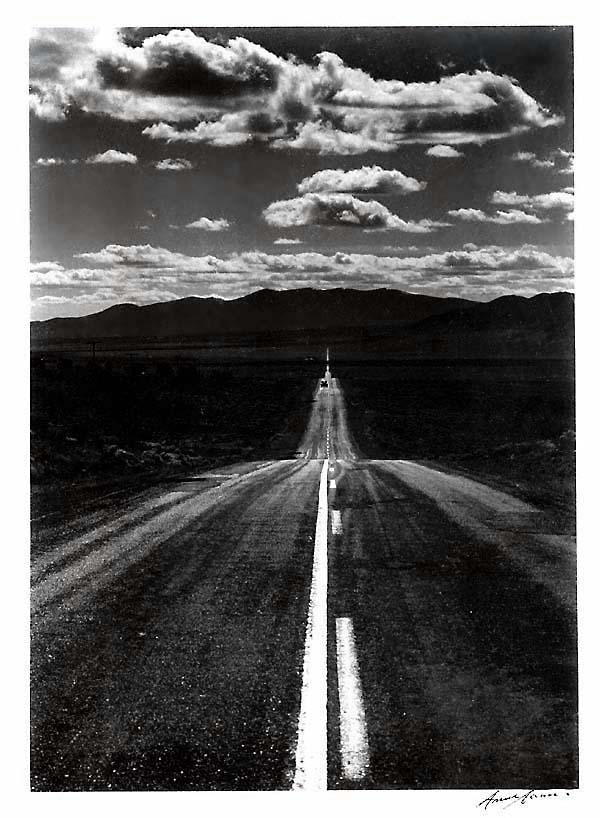
Road, Nevada Desert

Ansel Adams - Road, Nevada Desert - National Archives, Dept. of Interior
Susan Brannon
9 August, 2011
Road, Nevada Desert- 1960 This is a good example on perspective balance, again, plays a part. the pitch black desert is separated from the rough sky by the horizon. contrast obviously plays a role as well. the road running directly through the middle of the shot for what seems to be forever.  To develop the images of the clouds, Adam's must have "dodged and burned" the sky area.

24 July 2011

What is the Best Time for Taking Images?

24 July 2011

Photographers refer to the best times as “the golden hour”.  This refers to the first and last hour of sunlight.  Some call it the “magic hour” and others simple call it the “best hours”.
This is for outdoor photography, documentary, travel, nature, people and culture, architecture, and panoramas.

Why is this so?
Because the quality of light, color and the special “glow” you see at that time of the day.  Most of the time, the advantage is that you will not get overexposure's with your shots!  The colors are not drained, or washy as in high noon image taking.
shadows compared to the shots taken when the sun is at its full height.

The sun is in its lowest position, so the shadows become more pronounced with a warm soft glow.  At these times, you will think that you will not be able to capture any better shot that what you see, but if you are patient, you will have plenty of time to capture the soft glow, as the sun rises or sets.  The light changes quickly and will fade into the night.

For sunsets, I have found that waiting until that last moment, is when I capture the best images.


Camera settings

1)   Experiment with your settings. Switch off that Auto Mode!
2)  Turn off the auto white balance and adjust manually the white balance to your desired mood.
3)  Slow down the shutter speed a bit.
4)  Bring a tripod with you when taking shots during the Golden Hour is important to avoid camera shock.

Check the Weather

You must always check the time of sunrise or sunset in your local area. Never assume. Always check for the weather forecast. If it’s too cloudy or it will rain, then there’s no point going out. Try again tomorrow.

Related lessons:
Aperture and f/16 Rule
Shutter Speed Basics

Bracketing
Depth of Field
Focused Bracketing or Photo Stacking

22 July 2011

Tips for Travel Photography


Susan Brannon
30 July 2011
Tips for Travel Photography

So, you want to travel the world and take great shots while you’re at it!  Traveling around the world is one thing, taking great images is another…and selling your images is quite a different story!

Every place has its own look, culture, and lighting.  Your images should capture all the qualities and the images should say something about the place.  Our photographs should create memories, those that may be forgotten, the moment when you see your first glorious monument, of mountain to climb.  When you look at your images, you will want to remember those moments as you did when you first saw it.  In order to capture that moment, we need to think, feel and look at the setting when we are about to take the photographs.  In spite of our physical and mental preparation, knowing and understanding the culture here are a few things that may help:

•    Take a polarizing Filter- My moto, “Never leave home without it” This reduces reflections, darkens a blue sky while allowing the white clouds to stand out. They also take away the haze.  I like them for desert areas and water areas!
•    Bring a wide -angle zoom – another moto?  Never try to take a landscape image without it!  Set your lens at 17mm and your f-stop at 11.  You will get the best depth-of field.  I like the f/2.8’s they are flexible and I can shoot both indoors and outdoors.
•    Bring a telephoto Zoom- this helps with people images, documentary and isolating a part of a landscape.  You can cut out the clutter on a crowded street when you want to focus on one beautiful subject.
•    Walk to out of the way places, down alleyways, don’t eat at tourist places, get out there into the local crowd.  Stay out late and always have your camera with you and always keep your eyes open.
•    Keep track of when things happen.  For example, you may be in a spot that is too crowded to take an image.  Remember the time and go back at another time to take your shots.  Find out when the sun rises and goes down.  These are the best times to capture a beautiful glow in your image by using the natural light.
•    You must make time for your photography.  If you are with a tour group, it will be difficult to take quick wonderful shots.  You need to travel with people who will wait for you and let you take your images.
•    Read up on how to photography landscape, people and street photography before leaving.  You will want to know how to take all types of shots.
•    Always, always, always…use this rule of thumb: when you see what you think might be a nice shot…walk one meter to your left, to your right, forward and backwards, up and down.  Most likely, you will find a better shot.
•    Good image taking requires patience; I will say this again, good image taking requires patience.  Wait for the right moment.  Wait again.  You will have to wait for the people to move, the light to change, the bird to land on the tree branch.  Waiting and patience are the keys to good image taking.

Exposure

22 July 2011

Exposure is how much light is absorbed into your cameras sensor.  If the shot is exposed for too long, the image will be “washed out”, by letting too much light exposed to your film or digital sensor.  If the image is too dark, then the exposure was too short.

Most cameras have a “light sensor” with a meter inside of your camera that you can see when you look through the lens.  This meter will tell you how much light is being exposed to the sensor.  Normally, there is a middle line which is telling you that the exposure is just right, if it is to the right, then it is too much, or to the left, there is not enough exposure.

If you learn how to control your exposure, you can create some beautiful images.
To do this, you will need to control your shutter speed (The amount of time that your shutter opens to expose the light) and your aperture (The size of the lens opening to let the light in)

Example:  Lets say you are near a fountain in a garden and the correct exposure is f/8; 1/250s with a ISO of 100.  You decide that you want to freeze the water coming out of the fountain, but you cannot make your image any darker (underexposed) or too bright (over exposed)  What do you do?
a) Change your shutter speed to 1/500s, this allows ½ of the amount of light in.  But you cannot stop there, because then your image will be underexposed.  You must compensate to do this
B) Change your f-stop to 5.6, which will give you a larger aperture to let in more light. 

Now you have the same exposure for the image, but your shutter speed is faster that will allow you to freeze the water!

Example:  You are inside and the light is too low to obtain the correct exposure but the problem is that you camera will not be steady and your image will be blurred.  Your settings are:  f/5.6; 1/60s and ISO 100. The largest aperture for you camera is f/4, one stop faster that will result in f/4; 1/125s/ ISO 100.  The shutter speed is still too slow and you will have camera shake.  Since you cannot change the aperture anymore you will have to change your shutter speed and ISO to compensate.  Change your ISO to 200 and up one step to f/250s.  This will allow you to take your image and be sharp enough to take a photograph.

See?  All three parts are related to each other the ISO, shutter speed and aperture.  If you change just one, then your image will be either overexposed or underexposed.  If you change both, you can keep the balance.
Instead of falling water, i included falling snow!  This was taken at f/7.1; 1/25s and ISO 640


Overexposure:

This occurs when the sensor is exposed to too much light.  The result will be white images or white around the areas of the light source.  Sometimes it is impossible to expose the image without any overexposed areas.

Underexposure:

This is the opposite of overexposure, the sensor does not pick up enough light creating dark and black areas.

Note if you are using a digital camera, it is always easier to bring back shades and color from an underexposed image, than the other way around.  (Using PhotoShop)


Related lessons:
Aperture and f/16 Rule
Shutter Speed Basics

Bracketing
Depth of Field
Focused Bracketing or Photo Stacking